- Print
- DarkLight
- PDF
Scope of Work - Document360 (1)
ABU DHABI NATIONAL OIL COMPANY INFORMATION TECHNOLOGY UNIT |
Knowledge management system
Scope of Work
COMPANY Group IT
Thursday, 29 September 2022
Table of Contents
2.1.3Workflow assignment and status change8
3.1Search in Knowledge base site15
4.4.1Provide case studies and references of successful implementation for other clients21
4.4.2Provide the solution architecture and its technical details21
4.4.3Installation or activation or customization of the software ( one time fee)21
4.4.5Implementation of necessary security access and data validation controls.21
4.4.7Provide user and system manuals for solution configuration and maintenance21
4.5.1Azure Active Directory (ADD) with Single Sign-On (SSO)21
4.6User Access Administration & Management22
4.6.1System should be capable of giving access, editing or cancelling access to users22
4.6.2The user access will be based on the team groups and reader froups policy defined in the tool22
4.6.3System be capable of grouping users based on access levels (Access Control List)22
4.6.4All access attempts to the platform/solution must be logged for all modules22
4.6.5System should be capable of providing reports with regards to user activities22
4.7Scalable and Secure Solution22
4.7.1Based on high availability22
4.7.2Based on standard application servers22
4.7.3Scalable both vertically and horizontally22
4.7.4Supporting Citrix Secure Web for users22
4.8.1Security Assertion Markup Language [SAML] and OAuth22
4.8.2Standard Operating Systems (Windows, Macintosh, iOS, Android, UNIX, Linux)22
4.8.3Standard Web Browsers (Chrome, IE, Firefox, Safari, Opera – last three versions)22
4.8.4Standard Modern Devices (Desktops, Smartphones, Tablets, Phablets)22
4.8.5Capability to Generate Detailed Technical Solution Reports22
4.9Handover & Documentation.22
4.11Information Security Requirements23
4.11.1Collect detailed logs of all sensitive activities and transactions23
4.11.2Strong AES-256 encryption for data security23
4.11.3Strong mobile security to protect data on mobile devices23
4.11.4Implement preventive measures against all kinds of vulnerabilities23
4.11.5Implement preventive measures for threats such as XSS, SQL injection, CSRF23
4.11.6Implement segregation of duties and role-based access control23
4.11.7Implement controlled separation of services and access to them23
4.11.8Deploy solution in multi-tier architecture model23
4.11.9Segregate the solution layers logically and physically23
4.11.10Full functionality of software be operational behind Web Application Firewall23
The solution will allow to create a self-service knowledge base site for readers. Content producers get the centralised portal to create,organize, distribute, maintain and update content whereas the readers get the ease of access and feedback capablity.
There are 5 core Elements
- Knowledge Base Site (Knowledge base reader site is the front end articles are displayed)
- Knowledge Base Portal (Knowledge base portal is the back end or admin interface where articles are created and all other setting and configuration of the tool are available)
- Integrations & Extensions (To connect other 3rd party tools)
- Knowledge Base Assistant
- Platform API
Business Requirements
The primary objective of using this solution will be for Creating, Approving, Publishing and Managing various document types such as policies and procedures online & sharing via MS teams or other possible internal team collaboration application, AI chat bots via API.
The main function is to securely provide access to all the employees to the above mentioned documents.
The Implementation of the solution will be done in Azure cloud environment and products or technologies used in the solution will be discussed further below.
Business Process
Create & Update
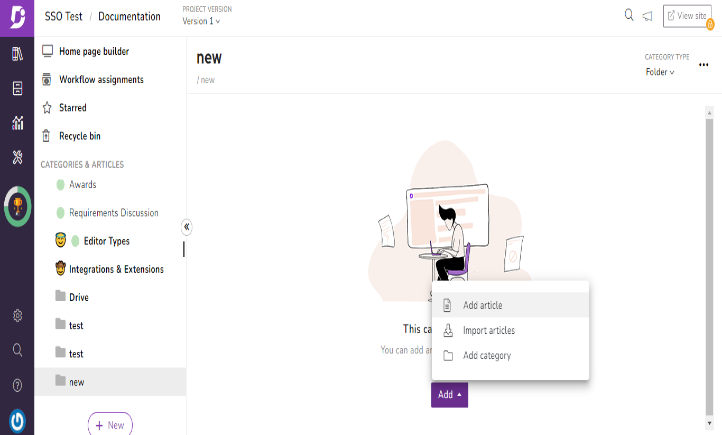
You can add articles inside the already created category or subcategory. If you have a blank knowledge base, then first need to add a category before you can add an article.
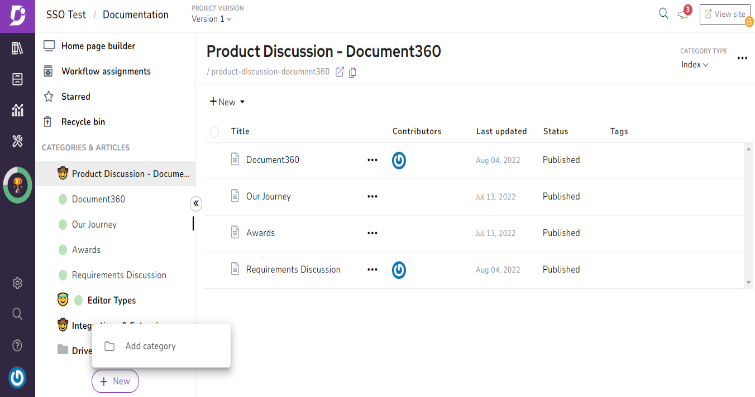
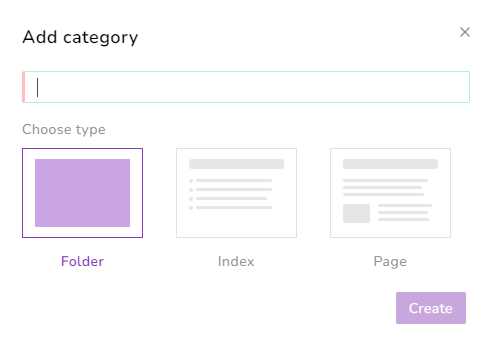
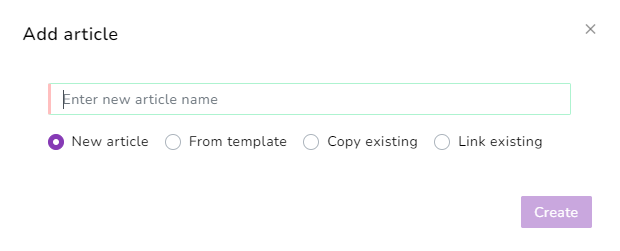
The Add article module opens with four options
- New article
- From template
- Copy existing
- Link existing
New article
Select the New article(default selection) in the Add article module. Type in the article title and click on the Create button.
From template
Select the From template in the Add article module. Choose a template from the Select a template dropdown, edit the article title, and click on the Create button.
Copy existing article
Create a clone article of an existing article from your project's respective version and language.
Select the Copy existing in the Add article module. Search and select an article from the Select article search bar, edit the article title, and click on the Create button.
Link existing article
This creates a shared article among the different categories. The shared articles are termed as References in.
Updating existing artilces
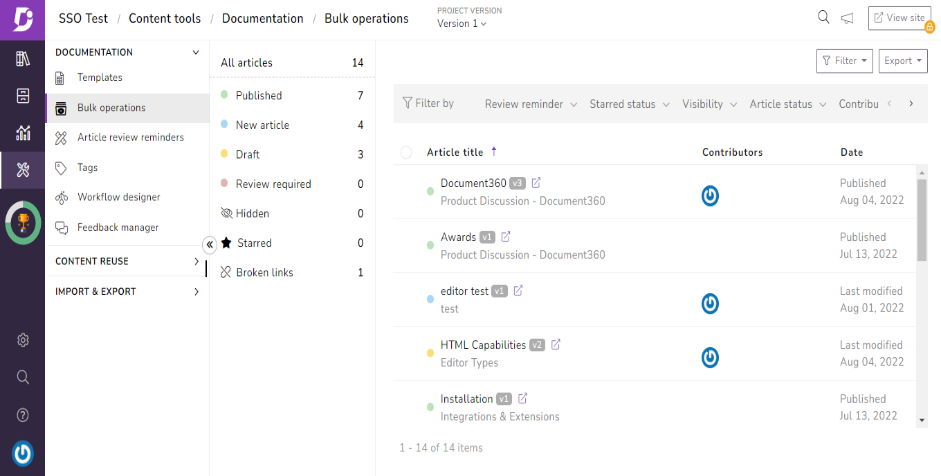
When you want to publish a bunch of articles, doing it by visiting each article can be time-consuming. In such cases, we recommend using the Bulk operations feature to publish, hide, show, delete, or move multiple articles at one time.
Versioning & rollback
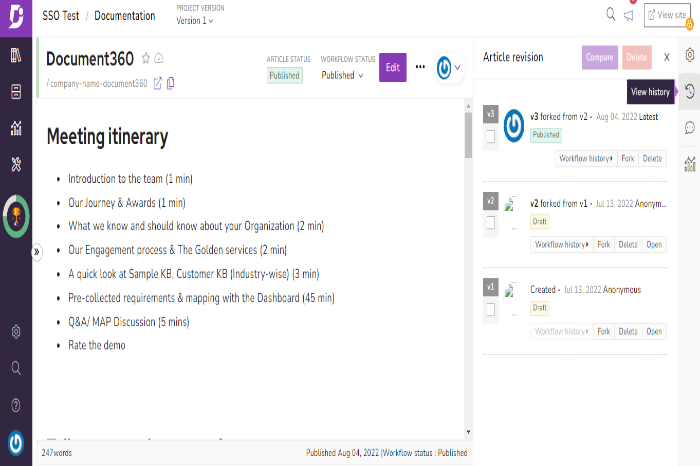
In the solution any time a project member clicks the Edit button on a published article, a new, unpublished version of that article is created, and the old version is added to the article’s version history, but remains live until the new version is published. This allows project admins and contributors to compare differences between versions and revert to a previous version at any time.
Using article versions
There are three actions you can take on article versions:
Fork: Creates a new version of the article at that point in time, and adds it to the version list.
Delete: Deletes that article version.
Open: Opens the version of that article at that point in time, old or new, in the text editor.
You can make any previous version of an article public by opening that version and clicking Publish.
You can also see detailed information about each version including the version number, the author, when it was created and which version is public.
Rollback Articles
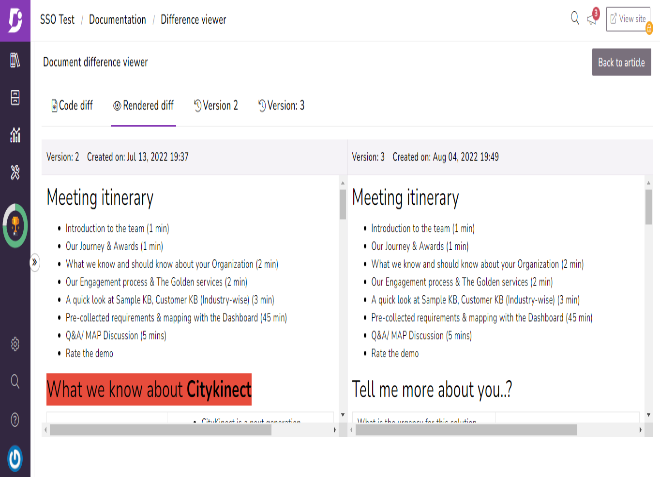
You can open any two versions at any point in an article’s version history and compare them.
To compare versions:
Open the View History menu.
Select two versions to compare by clicking their checkboxes.
Click View Diff.
The difference viewer displays the older version on the left and the newer version on the right. Content that’s been removed will be highlighted in red , content that’s been added will be highlighted in green.
Once you open an older version you can republish the same of modify it ad republish it.
Workflow assignment and status change
Workflow in the solution creates various stages or checkpoints and helps track an article/category page from the initial draft (New article) to a published article. Users can create, edit, or delete workflow stages (status) depending on their documentation requirements. Manage the documentation cycle by assigning project team members to any status and set due dates for completion.
Workflow status actions
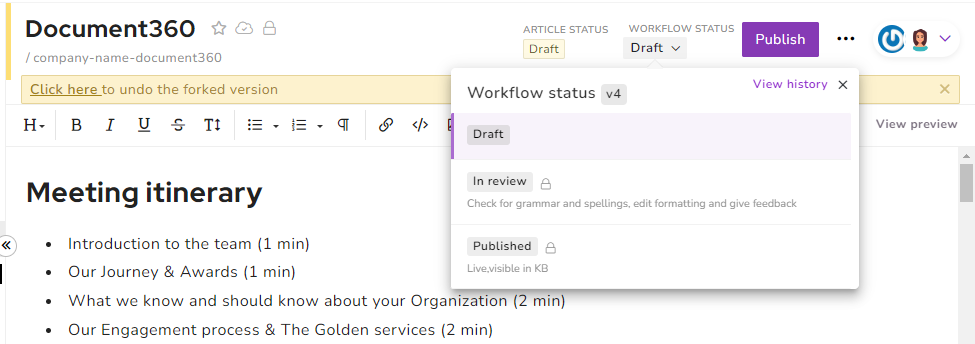
The Workflow status option can be accessed on the top-right, adjacent to the Publish/Edit button from the Documentation editor.
1. View the current status
The active workflow status of an article would be displayed as a tag below the Workflow status option just above the editor
For ex. Draft, In review, etc.
If more information about the current or other status in the workflow is required, then follow the below steps.
Click on the Workflow status dropdown at the top of the editor
The list of available workflow statuses and their supporting information (due date, approved status, assignee) would be available
If the article is active in any one status, the preceding statuses would be struck through
For ex. In review
If the article is in the published state, then all the statuses would be struck through
For ex. Level 3 review
2. Setting a due date
Users can set due dates for both active/current and upcoming statuses in an article workflow.
Click on the Workflow status dropdown at the top of the editor
The list of available workflow statuses would be available
Hover over the status for which the due date has to be set
Click on the Set due date (timer) icon
A calendar selection widget would appear, and the user can select any date from the current to any date in the future (days, months, or years)
To clear any existing due date, click on the Clear due date option below the date selection calendar
3. Setting an assignee
The solution will supports the addition of only one assignee to one workflow status.
- Click on the Workflow status dropdown at the top of the editor
- The list of available workflow statuses would be available
- Hover over the status for which the team member has to be assigned
- Click on the Assign owner icon next to the Set due date
- The list of project team members would be available
- You can also use the Search by Email bar at the top to filter out the team member
- Click on the Assign (tick) icon next to the team member
- The team member would be assigned the particular status and a notification mail would be sent to the team member’s Email
- The team member would be assigned the particular status and a notification mail would be sent to the team member’s Email
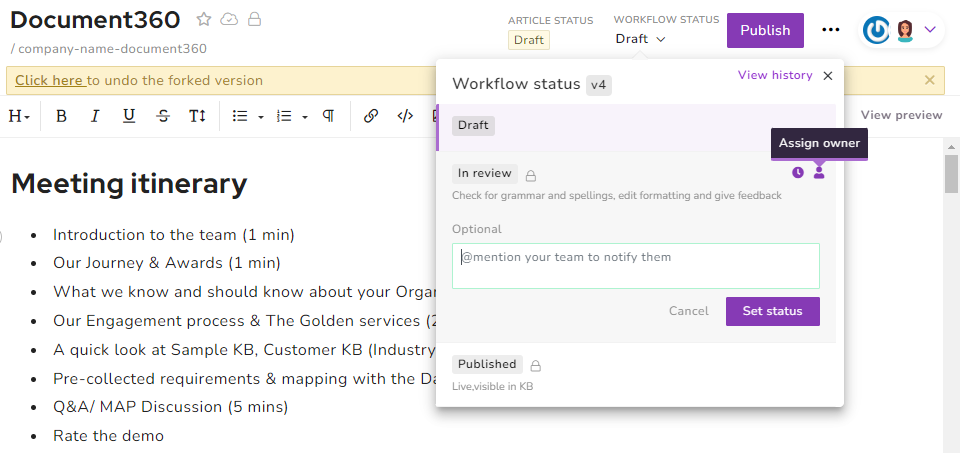
4. Activate a workflow status
Users can activate the next status if they have completed the assigned workflow status.
- Click on the Workflow status dropdown at the top of the editor
- The list of available workflow statuses would be available
- Hover over the next status and click on it
- An expanded view of the status would appear along with the comment box
- Use the comment box to provide any information to the next assignee by tagging them using the @ command. This field is optional
For ex. @kingson, Please make sure the UI flow is updated. - Click on the Set status button and the next workflow status would be activated
Publishing
Once an article is drafted and edited, click Publish, then Yes in the confirmation prompt and the article will be added to your knowledge base.
Everytime you publish an article a new version will be created which can be used to compare and rollback if required.
Accesiblity
- Platform access to all users and SSO users of the organization.
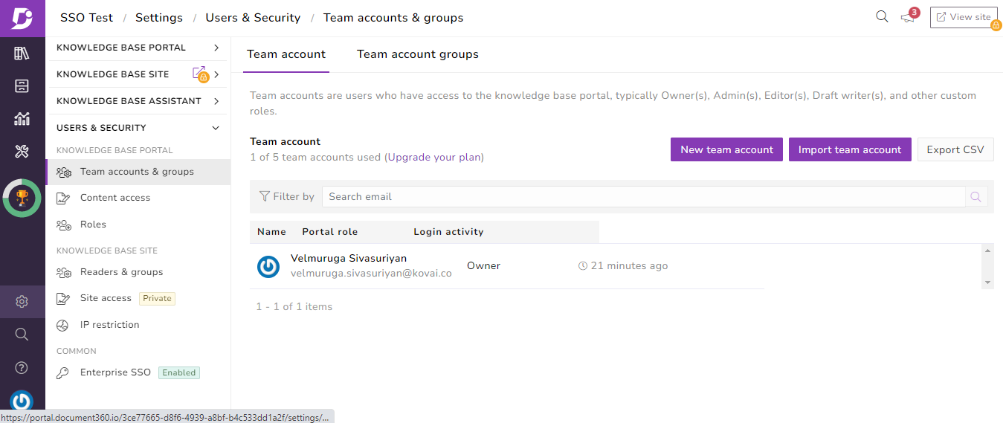
- Users & Security (Knowledge Base Portal)
Team accounts are the contributors to the knowledge base. They can view and manage the content of a knowledge base as per their roles and access (Owner(s), Admin(s), Editor(s), Draft writer(s), and other custom roles).
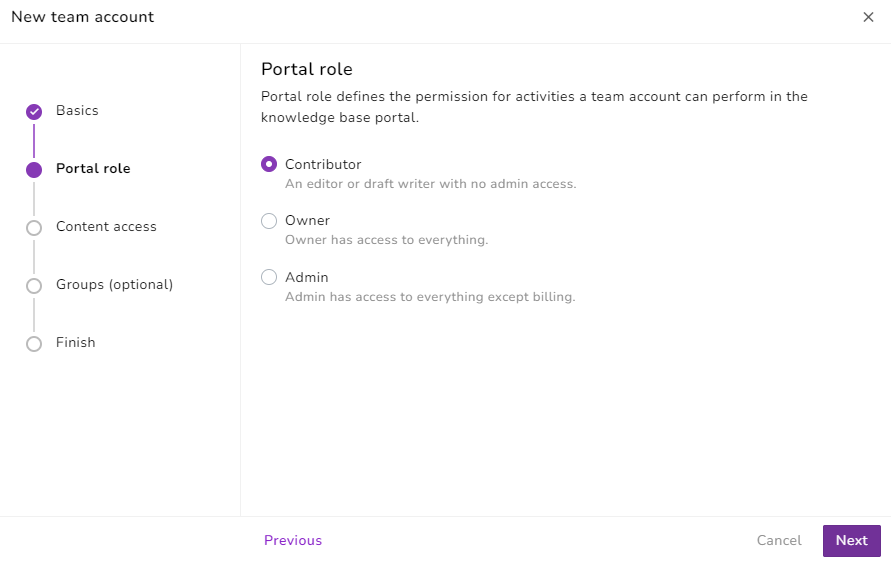
Portal role: Portal role defines the permission for activities a team account can perform in the knowledge base portal.
- Owner - Owner has access to complete
- Contributor- An editor or draft writer with no admin access.
- Admin- Admin has access to Knowledge base portal except billing.
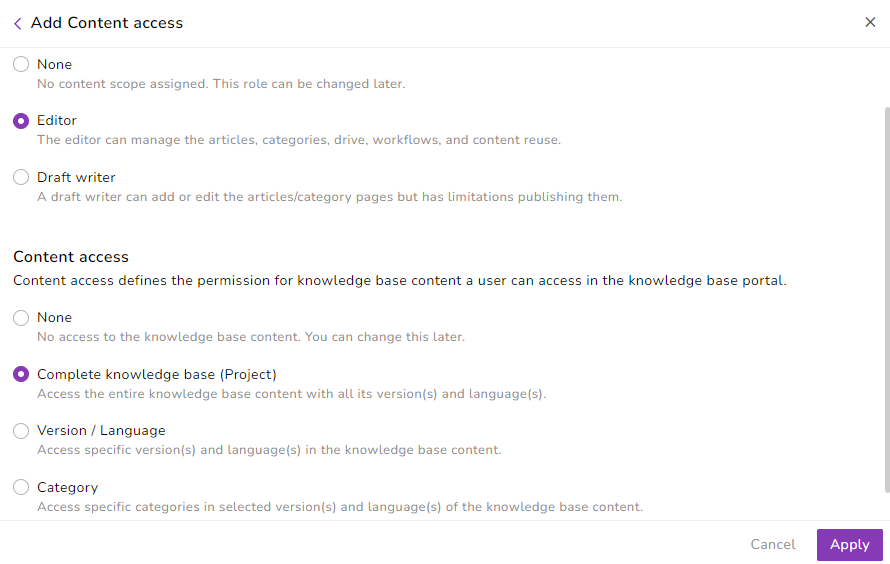
Content role & access: Team account can have different level of role and access for various parts of the knowledge base content. Provide at least one role and access to start with, you can modify it later.
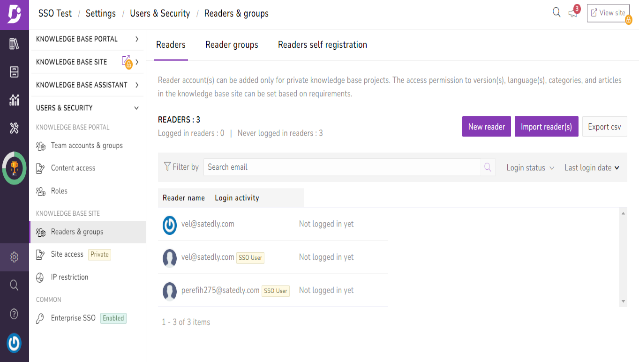
- Readers & Groups (Knowledge base site)
Readers & groups: Reader account(s) can be added only for private knowledge base projects. The access permission to version(s), language(s), categories, and articles in the knowledge base site can be set based on requirements
Readers Accounts is an end-user who must first log in with their credentials to view the version(s), language(s), categories, and articles in a knowledge base site.
Content access: Readers have the permission for the content a reader account can access in the knowledge base site
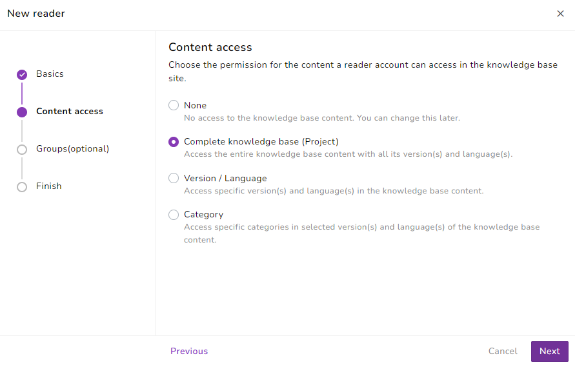
- Access to the platform through Website, MS Teams(extension) or any other medium where the solution is compactible is available.
Search in portal
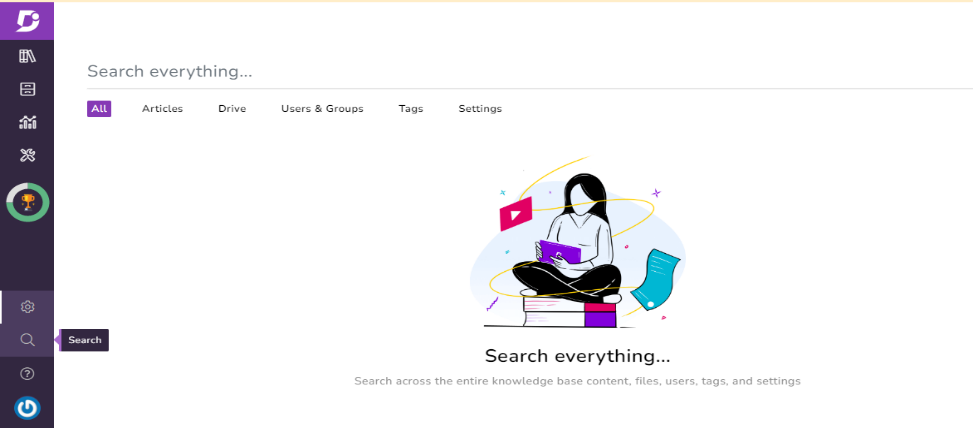
When there are thousands of files and folders on the internal Drive in the solution, the easiest way to retrieve a file is to use the search functionality.
Click on the search icon at the top. Type in the file name, and as you type the results are narrowed down. This is easy if you know and remember the file name.
If you don’t, you can type in keywords related to the file that can be found either in the Name, Meta title, or Alt text to retrieve your file.
Search filters
Let’s say you have a vague idea of the file you are looking for, but do not exactly remember any keyword particulars.
- Click on the Drive main menu
- On the overview page, click on the Search option at the top-right
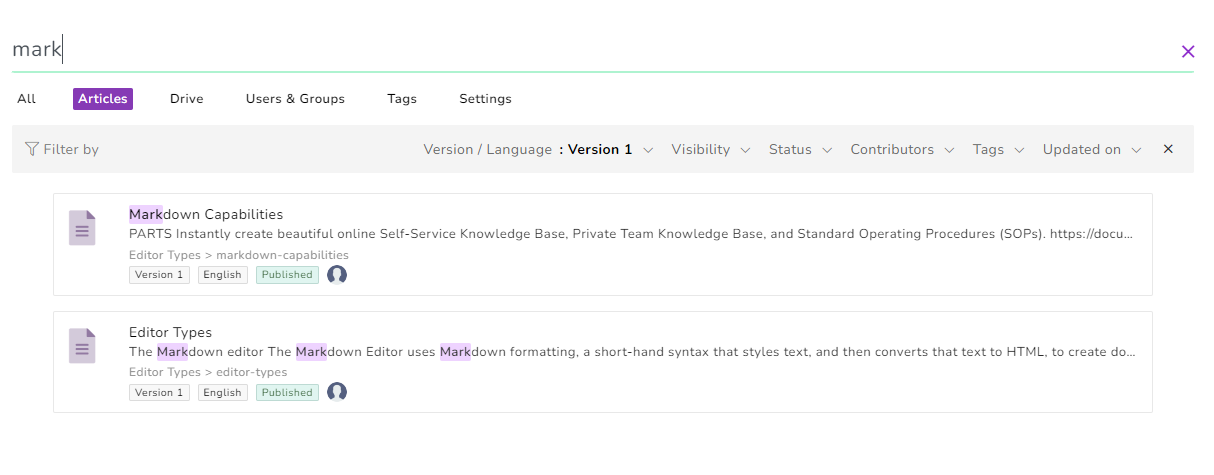
- A search bar with all the filters would appear
- Type in the search keyword to view the file results
- If no filter is selected, the search is performed on all the files available
- To add filters, select the dropdown and check the filters you require
For example, you want to filter the files updated in the last four days)
- Select the filter option and click on the Apply button
- Here is a brief look into the filter options available
- You can filter files based on the Updated date using time frames such as 7 days, 30 days, 3 months, and 1 year or you can select specific dates to search from
- You can filter by the Updated by specific project team member or account data. Most of the time, an article/category page is bound to have multiple contributors working on different roles in the project and, the Drive is common to the project. You can select one or more contributors in the search filter
- Clear/Reset filters
Clearing or resetting the search filter is easy. Just click on the x at the far-right in the search filter option bar.
If the search filter did not return any file result, an option is provided to reset the filter and try again. Click on the Remove filter(s) to see your item(s) below the page graphics.
- Folder specific search
When users perform a search on the search bar in the Drive, the search reach is limited to the files in the folder or subfolder that is open now.
For example, If the user is currently inside a folder called 'Updated images' and uses the search bar to search for a keyword 'Installation'. Then all the files in that 'Updated images' folder are searched and, the relevant search results are listed.
- How can I perform a search across all the files on Drive?
File search for the entire knowledge base can be done using the Search option in the left pane of the portal. For more information on this option, see
(or)
File search for the entire knowledge base can be done using the search bar from two locations on the Drive:
- All content
- My Drive
- Search bar availablility
The folder specific search functionality in Drive is available across the following instances:
- Inside individual folders/subfolders
- Recent
- Starred
- Recycle bin
- All content
- My Drive
- When accessing Drive from the documentation editor
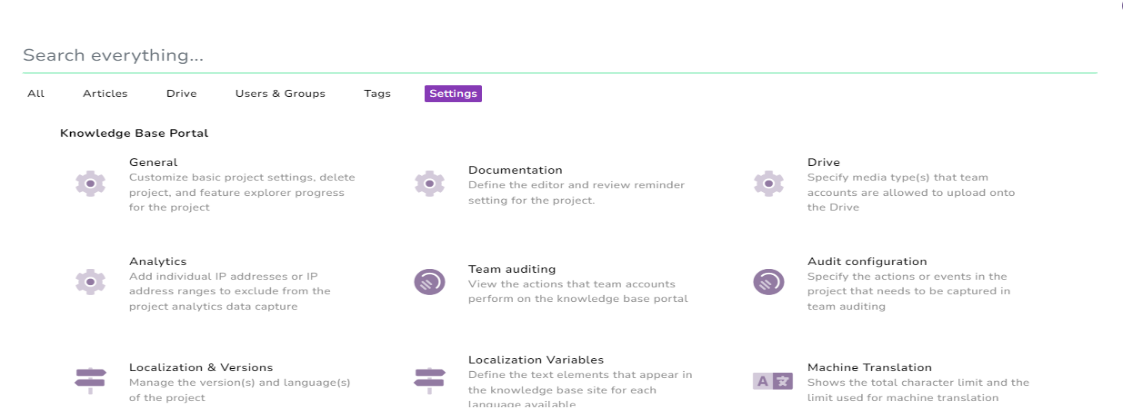
- Search in attachments
You can perform a keyword search for the content inside PDF files on the Drive. This comes in handy when a particular file needs to be chosen, but the file name does not clearly state the search keyword.
Earlier the same operation would involve manually downloading the PDF, opening it in a viewer, and searching for the keyword.
- Where can I access the search in PDF attachments?
This functionality can be used in the Drive menu pages and also when accessing Drive through the Insert file from the documentation editor.
Knowledgesite
Search in Knowledge base site
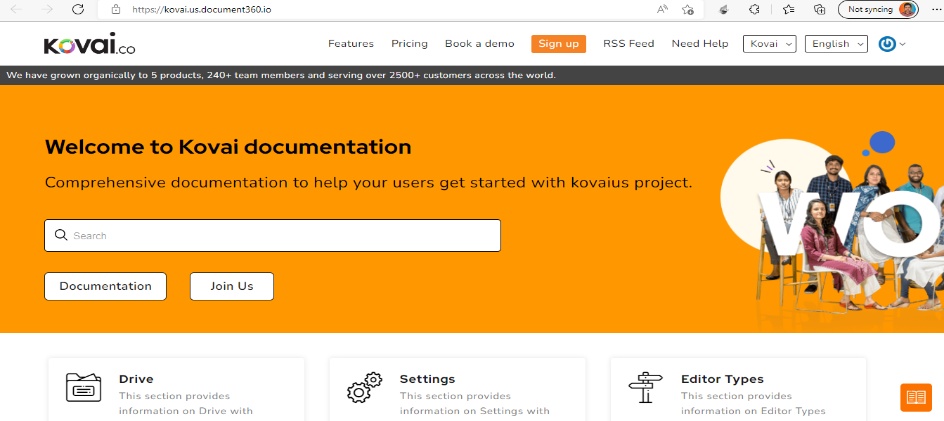
Your knowledge base includes a fast and intuitive search located above the articles. Results are filtered by relevance to the search term and are listed with the name of the article and a preview of the search term within the article.
Search bar on the home page
The header section of the home page includes a search bar by default, however, it can be hidden. Hiding the search bar in the header of the home page does not affect its appearance on the knowledge base.
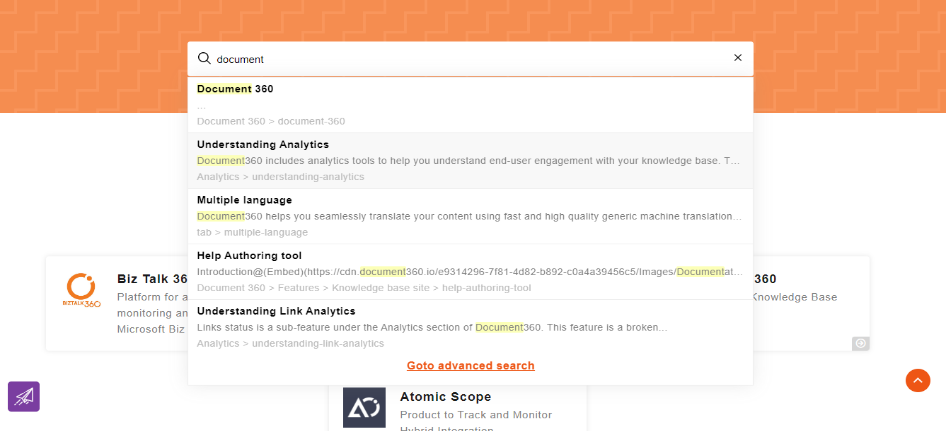
Search in attachments filter
Readers of your knowledge base can now search for content inside PDF attachments. This search functionality is an add-on feature in the knowledge base portal and would be activated for customers on-demand basis.
Adding the attachments filter in Search
Once activated, users can enable or disable the search in attachment filter tab from the knowledge base portal.
- Go to Settings → Article settings & SEO → Article settings → Search setting
- Turn on the Show attachment tab in search toggle
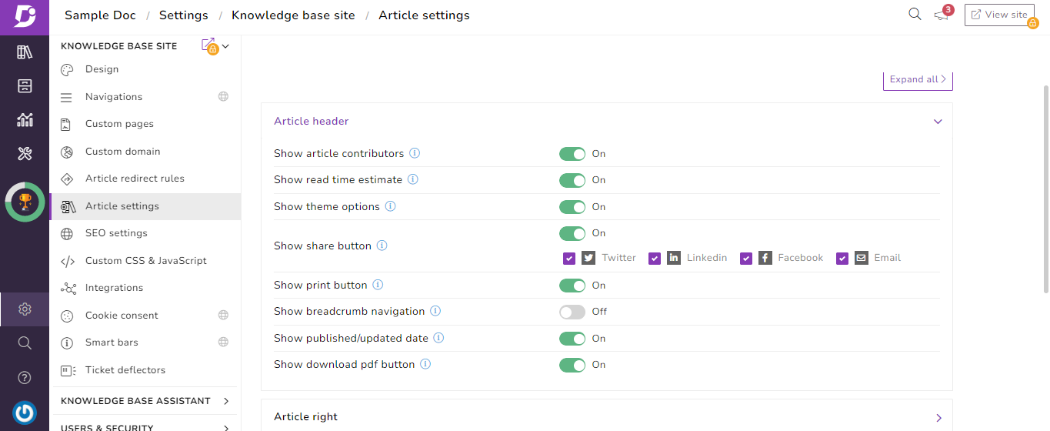
Once enabled, readers on the knowledge base using the search bar have the option to filter the keyword search results from articles content or attachments in articles.
Feedback and comments
Article Right or Bottom
Some article details can be displayed on either the right side or the bottom of the article.
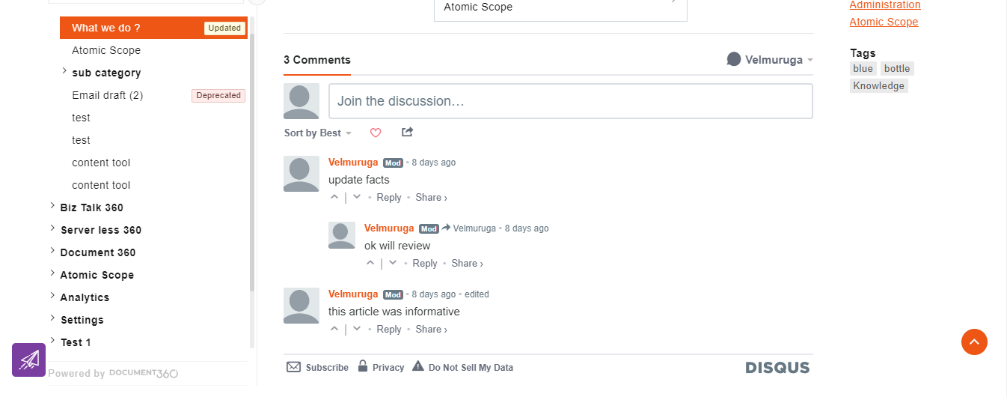
- 1. Show article comments
To allow comments at the bottom of articles.
Follow the below steps to add the comments section in the articles:
* Turn on the Show article comments toggle
* Integrate Disqus plugin
Disqus Integration
Learn how to set up integration with Disqus and allow comments on individual articles in Publishing an Article.
You can also allow comments for individual articles:
- Go to the desired article and click the Article settings icon on the top right. The Settings blade appears on the right
- Under general, select the checkbox of the Allow comments and click Save
This checkbox is selected by default.
- How to comment in an article?
- Go to the desired article in the Knowledge base site
- On the bottom, you can find the comment section
- Login to Disqus, and start adding comments
3.2.1. Receiving feedback
Once a reader leaves feedback in your Knowledge base or Knowledge base assistant, the feedback will appear in the feedback manager list.
How do readers provide feedback for an article?
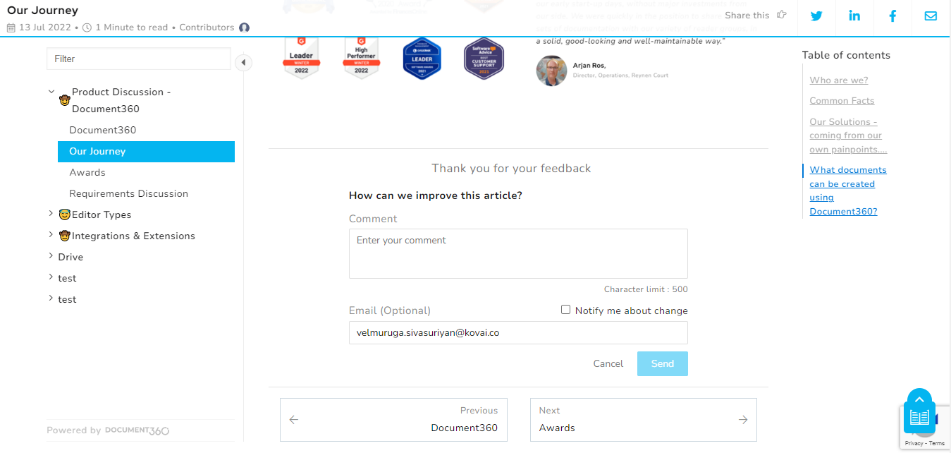
When the feedback form is enabled, readers can leave feedback for the articles/category pages. The feedback form appears at the bottom of the article/category pages.
Positive response
When a reader clicks the Like button, a Comment section appears with the option to leave a comment. Then, click Send. If a response is required for the provided feedback, the reader must select the Notify me about change checkbox, provide a valid email, and click Send.
Negative response
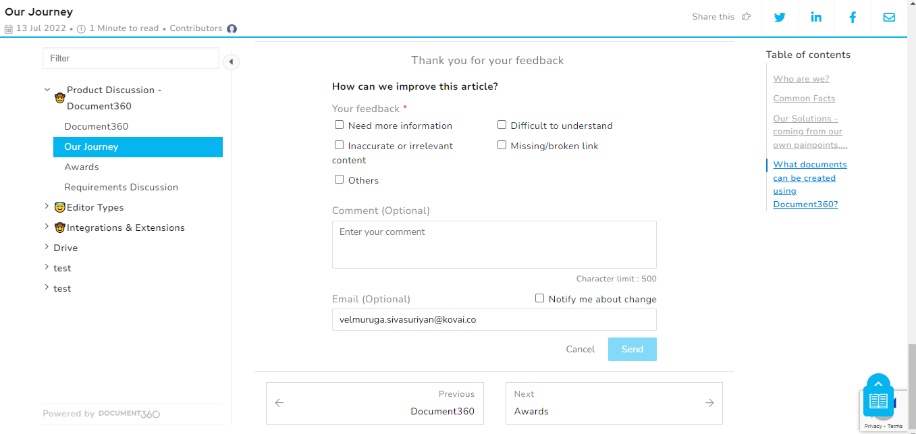
When a reader clicks the Dislike button, a set of below common feedbacks appears:
- Need more information
- Difficult to understand
- Inaccurate or irrelevant content
- Missing/broken link
- Others
3.2.2. Addressing feedback
Once a team account is assigned feedback, the team account should access the feedback and update the documentation accordingly.
- Go to Content tools → Documentation → Feedback manager
- You can find the list of reader feedback
- Use the Assigned to filter option to view the list of feedback assigned to the team account
- Click on the desired feedback in the list, and a detailed view of the feedback appears
- Click the Open in editor icon next to the article name, and the article editor appears in the new tab
- Update the article content
- Once done, navigate back to Feedback manager and change the status to Complete

Technical Requirements
Scope Brief
- Provide Knowledge creation and management functions for company.
- Documentation editor – Provide two types of editors Markdown & WYSIWYG (can be selected on individual article level) with rich features like File Attachments, embed files (images, videos, pdf etc), Hyperlinking
- Team account- can have customized multilayer content roles for content manipulation, and custom portal roles for back-end settings manipulation.
- Custom workflows – assign owners for Drafting, approval, and publishing of documents.
- Advanced Customization -Include custom CSS to define styles for your web pages colours, fonts, layout etc. Custom JavaScript can be included to achieve a specific function or integration.
- Knowledge base versions – for creating and managing segmented documentation for multiple sub-companies under a single Domain.
- API for remotely control the content, project versions and access privileges
- Integrations & extensions via custom HTML / JS / Tokens
Supply of Software
The contractor is expected to provide the software with the required:
- Licenses
- Implementation & Configuration (one time fee )
- Handover & Documentation
- Support
- Training (one time fee)
Implementation
The proposed solution is mandated to meet the business and technology objectives of COMPANY, and also should take into account the technical environment and business requirements as desired by COMPANY. The solution shall be appropriately configured and/or customized to the satisfaction of the organization. In this regard, the contractor will need to carry out the following activities:
Provide case studies and references of successful implementation for other clients
Provide the solution architecture and its technical details
Installation or activation or customization of the software ( one time fee)
Transferring the duly-tested configuration to the production environment (has to be done manually configuration cannot be automatically transferred from test to production environment)
Implementation of necessary security access and data validation controls.
Compliance to National Electronic Security Authority information security standards (not available)
Provide user and system manuals for solution configuration and maintenance
Training the trainers (users and technical staff) for managing the solution (one time fee - best practices program)
Required Integrations
The proposed platform/solution needs to be integrated with the following:
Azure Active Directory (ADD) with Single Sign-On (SSO)
Employees across the COMPANY Group shall seamlessly access the proposed Platform
Employees shall not have to login explicitly while accessing the proposed Platform
Employees shall get long sessions accessing and switching across the COMPANY Systems
MS Teams Integration
The platform to be integrated with COMPANY MS teams applicationfor internal access and sharing of manuals and other documents
MSA archer
The Platform shall integrate with MSA archer via API.
User Access Administration & Management
System should be capable of giving access, editing or cancelling access to users
The user access will be based on the team groups and reader froups policy defined in the tool
System be capable of grouping users based on access levels (Access Control List)
All access attempts to the platform/solution must be logged for all modules
System should be capable of providing reports with regards to user activities
Scalable and Secure Solution
The proposed solution shall be:
Based on high availability
Based on standard application servers
Scalable both vertically and horizontally
Supporting Citrix Secure Web for users
Technical Compliance
The proposed solution shall comply to and have support for the:
Security Assertion Markup Language [SAML] and OAuth
Standard Operating Systems (Windows, Macintosh, iOS, Android, UNIX, Linux)
Standard Web Browsers (Chrome, IE, Firefox, Safari, Opera – last three versions)
Standard Modern Devices (Desktops, Smartphones, Tablets, Phablets)
Capability to Generate Detailed Technical Solution Reports
Handover & Documentation.
The contractor must document the infrastructure design, integration points, physical operation model (L1 and L2), support model (L3), and the communication rules and protocols between the infrastructure components and report them to COMPANY via COMPANY template.
Training
Training for business, technical and admin users will be required at COMPANY. User guides, technical guides, and troubleshooting manuals as documents and as interactive learning materials are also required of for any self-training.
Information Security Requirements
.Additionally, the proposed solution should confirm to the following security requirements:
Collect detailed logs of all sensitive activities and transactions
Strong AES-256 encryption for data security
Strong mobile security to protect data on mobile devices
Implement preventive measures against all kinds of vulnerabilities
Implement preventive measures for threats such as XSS, SQL injection, CSRF
Implement segregation of duties and role-based access control
Implement controlled separation of services and access to them
Deploy solution in multi-tier architecture model
Segregate the solution layers logically and physically
Full functionality of software be operational behind Web Application Firewall
\
Our Products
Our portfolio of carefully crafted software products powers 2500+ customers across the world to run their businesses.
Our Products
Our portfolio of carefully crafted software products powers 2500+ customers across the world to run their businesses.
#ToGetherWeGrow
Vimal


